
Step 1: Go to forms.google.com or Google Drive
- The first step is to open Google Forms. You can do this by going to forms.google.com in your web browser, or by going to Google Drive and selecting "New" > "Google Forms.”

- Next, you can select a template. The Google Forms platform offers many different types of Google Forms survey templates to choose from, so you can pick the one that best suits your needs. There are templates for RSVP, Contact information, Party invites, and more!
- However, If you’re unsure of which template to use, you can always start with the ‘’Blank’’ template.

- After you have selected a Google Form survey template, the next step is to change the title of your form. To do this, click on where it says "Untitled form" text at the top of the page and enter a new title. For example, you could title your form "RSVP for My Birthday Party" or "Contact Information Form."
- You can also add a description to your form if you want to provide the responder with more context. To do this, click on the "Form description" text box and enter a short description of your form that will appear below the title.

- Once you have given your form a title and description, it's time to start adding questions to your Google questionnaire! Google Forms makes it easy to add a variety of different question types, including multiple-choice, drop-down, short answers, and more.
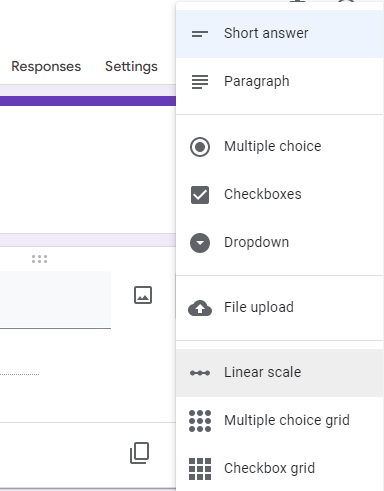
- To add a question, simply replace the "Untitled Question" text with your question and then click on the answer type that you want to use. For example, if you are asking for someone's name, you would select the "Short answer" answer type.

- Google Forms also allows you to include images and videos in your questions. To do this, click on the image or video icon from the question toolbar. This is also where you can add section headers to your form if you want to divide it up into multiple parts. To do this, click on the "Add section" button from the question toolbar.

- Once you’ve added all of the questions that you want, it's time to move on to customizing the form to your liking!
- Google Forms offers a variety of themes that you can use to customize the look of your form. To select a theme, simply click on the "Theme" button from the top-right corner of the page.

- You can also create your custom theme by clicking on the "Customize" button. This will allow you to change the colors, fonts, and background of your form.
- Before you share your form with the world, it's a good idea to preview it first. To do this, simply click on the "Preview" button from the top-right corner of the page.
- This will open your form in a new tab, and you can test out all of the questions to make sure everything is working as it should.

- If you’re happy with the way your form looks, it's time to move on to sending it out!
Step 7: How to create a Google Forms links or share through email
- The final step is to share your form with the world! To do this, click on the "Send" button from the top-right corner of the page.
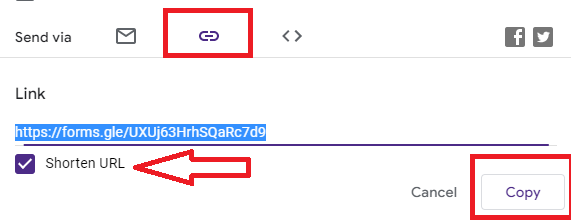
- This will open a sharing dialog, and you can choose to send your form via email or share it via a link. You can also embed your form on a website if you want.

- If you are sending your form via email, simply enter the email addresses of the people who you want to receive your form, add a subject and message, and then click on the "Send" button.

- If you’re sharing your form via a link, simply copy the link and share it with people through email, social media, or any other method. However, make sure to shorten the link if you are sharing it online, as the default link can be quite long.
And that's it! You have now learned how to create a form using Google Forms.
This comment has been removed by the author.
ReplyDeleteHi there,
ReplyDeleteThanks for the clear guide on creating and sharing Google Drive folders! I’ve always found Google’s sharing options a bit confusing, especially when dealing with different permission levels. Your step-by-step explanation really helped me understand how to properly set up shared folders for my team.
One thing I’m still unsure about is how to best manage large groups. Is there an efficient way to update permissions for many users at once? Also, do you have any tips on organizing shared folders so that important files don’t get lost in the mix?
Thanks again for the helpful post!
My website: https://comdev.eu/joomla-directory-extension